Really basic coding tutorial for the new Unity Input System

Really basic coding tutorial for the new Unity Input System

I was really curious about Unity’s new input system. Abstracting player inputs from all different platforms and devices into a single actions set is really smart – I mean, I’ve been working like that for years thanks to the Rewired plugin, it’s great. So it’s exciting that Unity now has a native way to achieve the same. But the big difference is that while Rewired makes it stupidly easy, the new Input system (seemingly) does not. It CAN, but Unity’s documentation is bad at explaining this, and frankly so are most of the tutorials I’ve watched or read, which is why I’m writing this quick guide.

For the purpose of this guide I’m going to assume you have some basic knowledge of the input system, like how to install it and create an Input Action asset. If not, this is one of the nicer tutorials I’ve seen so far to get up to speed (you’d only need to watch the first 6 minutes).

See, you used to be able to do this:

void Update() {
    if (Input.GetKeyDown(Keycode.E)) {
        // Interact with object
    }
}

For comparison, this is Rewired (given that you’ve already created input actions):

void Awake() {
    player = Rewired.ReInput.players.GetPlayer(playerId);
}

void Update() {
    if (player.GetButtonDown("Interact")) {
        // Interact with object
    }
}

Now, I’ve watched about a dozen tutorials on Unity’s new input system, and they all explain it in a different way, but this seems to be the preferred new method (given that you created an actions asset AND are using Unity’s PlayerInput component on the same object as the one with this script):

public void OnInteract(InputAction.CallbackContext context) {
    if (context.performed) {
        // Interact with object?
    }
}

void Update() {
    // ???
}

This obfuscates a lot of what the Input System is doing in the background, but it works. However, this is not how I code. It doesn’t make sense to me to have one function that does a thing in isolation, I want to be able to poll a button press whenever I need it. And attaching a PlayerInput component to each object seems like overkill too.

There is another way to do this, and it involves accessing the actions asset directly through code. Unity added a useful affordance for this, but the way I see most people explain this makes it sound hugely complicated in a way that I almost wanted to stop using the Input System. I’ll spare you the explanation, and instead tell you there’s an easier way.

The One Weird Trick

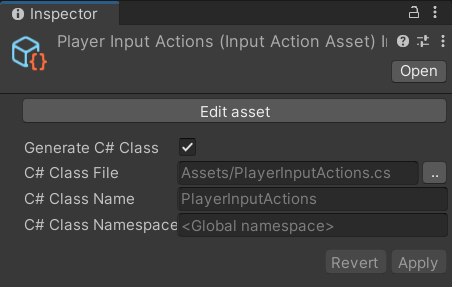
In this example mine I’ve already created an Input Actions asset in my project, called PlayerInputActions, and inside I’ve mapped the E key to the “Interact” action.

Step 1: Find your actions asset in the project hierarchy. Click on it, and in the Inspector, check ”Generate C# class” and hit Apply.

Step 2: Open any script where you want to perform an action, and add this code:

PlayerInputActions Input;

void Awake() {
    Input = new PlayerInputActions();
    Input.Enable();
}

void Update() {
    if (Input.Player.Interact.WasPressedThisFrame()) {
        // Interact with object
    }
}

This is the most straightforward way I’ve found to get the same functionality as I had before.

There seems to be half a dozen ways to call on this new input system, and I have no idea which one is the most failsafe and efficient, so if you know a better way, please let me know. The code above at least gives me the clean, easy implementation that I was used to.

Bonus

If you’re prototyping and you can’t be arsed to even create/use an action asset yet, you can also do this:

using UnityEngine.InputSystem;

void Update() {
    if (Keyboard.current.eKey.wasPressedThisFrame) {
        // Interact with object
    }
}

This is literally how it used to work, but of course it bypasses the benefits of the new input system entirely. But still, useful in some cases. You can also pass it gamepad buttons, etc.

Hope that helped!

5 thoughts on “0

  1. Yes! Finally, a tutorial with a coding style similar to my own. I’ve gone through several videos on the new input system and the way they wrote the code for the new inputs doesn’t click with me. Glad you found a similar way of doing it like the way the old system worked.

  2. THANK you! A script on a “Menu button controller” empty game object using your code worked! The menu is shown upon key press. I wish I could get the keypress to work along with the functionality in this code…but this code only works when the physical button is pressed in game, not when the key is pressed, even though the key is in action map. I tried including your code in the script below but to no avail. The below script is to show the “menu” as the in game menu, and works when I
    1. set it to the ‘menu’ game object in inspector,
    2. then press the button “menu Button” (that button has onClick event: PauseSystem (game object with PauseManager script on it) and PauseManager.PauseGame in the other drop down.

    But I cannot get it to ALSO work when I press the M key which is action mapped to ‘PauseGame’ in the characterControls Action Map. I feel like this should be such a simple add to get the M key to work too, but I am down a rabbit hole. Thoughts?

    public class PauseManager : MonoBehaviour
    {
    PlayerInput Input;
    public static bool paused = false;

    public GameObject menu;

    private void Awake() {

    Input = new PlayerInput();
    Input.Enable();

    }

    private void OnEnable() {
    Input.Enable();
    }

    private void OnDisable() {
    Input.Disable();
    }

    private void Start() {
    Input.CharacterControls.PauseGame.performed += _ => DeterminePause();
    }

    private void DeterminePause() {
    if (paused)
    PauseGame();
    else
    ResumeGame();
    }

    public void PauseGame() {
    Time.timeScale = 0;
    paused = true;
    menu.SetActive(true);

    }

    public void ResumeGame() {
    Time.timeScale = 1;
    paused = false;
    menu.SetActive(false);
    }
    }

  3. I couldn’t edit my comment but I got it working by combining the two ideas in a script for ToggleMenu Keys on an empty game object! Now it works from here if the Keyboard key is pressed and it works as a button if the actual button is pressed (just by adding the “runtime” info -add object, choose set Game Object active).

    using UnityEngine;

    public class ToggleElements_Keys : MonoBehaviour
    {
    PlayerInput Input;
    // I just dragged each GO I wanted to show into the slots in inspector
    public GameObject toggleSea;
    public GameObject toggleLand;
    public GameObject toggleSky;

    public static bool open = false;

    private void Awake()
    {
    Input = new PlayerInput();
    Input.Enable();
    }

    private void Start()
    {

    }

    private void OnEnable()
    {
    Input.Enable();
    }

    private void OnDisable()
    {
    Input.Disable();
    }

    void Update()
    // one for each button –using Close & Open voids I was able to add all 3 buttons
    {
    if (Input.CharacterControls.ToggleLand.WasPressedThisFrame())
    {
    IsItOpen();
    }

    if (Input.CharacterControls.ToggleSea.WasPressedThisFrame())
    {
    IsItOpen();
    }

    if (Input.CharacterControls.ToggleSky.WasPressedThisFrame())
    {
    IsItOpen();
    }

    }

    private void IsItOpen()
    {
    if (open)
    CloseMenu();
    else
    OpenMenu();
    }

    public void OpenMenu()
    {

    open = true;
    toggleLand.SetActive(true);
    toggleSea.SetActive(true);
    toggleSky.SetActive(true);
    }

    public void CloseMenu()
    {

    open = false;
    toggleLand.SetActive(false);
    toggleSea.SetActive(false);
    toggleSky.SetActive(false);

    }

    }

    1. That’s so great! I’m glad the code could help you out, and happy to hear you found a way to make it work the way you wanted to 🙂

Leave a Reply